

Overview
The Lead Intake Form is optimized for high conversion rates, collecting only essential information needed to generate accurate quotes. This form automatically generates when you create your account and can be embedded on your website.Form Editor
The form editor displays all questions in the left panel, organized by page. Click any question to select it and view its settings in the right panel.Adding Questions
Adding Questions
Click Add question below any page to open the question picker:Connected Questions sync data to Flashquotes fields:
- SMS Opt-in - Capture text message consent
- Lead Source - Track how leads found you (pre-populated options)
- Add-ons - Let leads select from your add-ons list
- Services - Let leads choose from your services
- Event Type - Let leads pick the type of event (wedding, corporate, festival, etc.) — configurable options that surface on the quote and event details, and that can drive event-type pricing on the Scale plan
- Text - Short answer input
- Multiple Choice - Single selection from options
- Multi-Select - Multiple selections allowed
- Dropdown - Single selection from a dropdown menu
Reordering Questions
Reordering Questions
Drag questions to reorder them within a page or move them to a different page:
- Click and hold any question in the left panel
- Drag to the desired position
- Release to drop
Page Management
Page Management
Adding pages: Click the + button in the Pages header to add a new page.Deleting pages: If you don’t need a page, simply remove it. Empty pages show a kebab menu (⋮) with a Delete page option. Pages with questions can’t be deleted until all questions are removed or moved, and the first page can’t be deleted.
Removing Questions
Removing Questions
Non-system questions can be deleted via the kebab menu (⋮) on each question row. System-required questions (like contact fields) cannot be removed.
Form Structure
Page-by-Page Breakdown
Page-by-Page Breakdown
The default lead intake form includes these pages (fully customizable):
-
Service Details
- Service length (configurable min/max hours)
- Guest count (with customizable increment buttons)
- Dynamic staff calculation (optional visual counter or text display)
-
Location
- Event address
- Venue details
-
Timing
- Event date
- Service start time
- Number of event days
-
Event Type
- Category selection
- Pricing impact factors
-
Customization
- Add-ons selection
- Service add-ons with drag-and-drop reordering
- Special requirements
-
Additional Information
- Event details
- Referral source
-
Contact Details
- First name, last name, email, phone
- SMS opt-in consent (if enabled)
Form Settings
Form Settings
Customize form behavior:
- Set redirect URLs post-submission
- Configure submission messages
- Configure Instant Pricing and Quoting modes
If no redirect URL is specified and Instant Quoting is disabled, the form displays a default submission message.
Required Questions
Required Questions
Control which questions are mandatory for form submission. Select a question and use the required toggle in the settings panel.System-Required Questions:
- Some questions are required by Flashquotes and cannot be changed
- These show “This question is required by Flashquotes” instead of a toggle
- You can mark custom questions as required or optional
- Required questions must be completed before form submission
SMS Opt-in
SMS Opt-in
Add SMS opt-in to collect text message consent:Learn more about SMS opt-in →
- Click Add question on any page
- Select SMS Opt-in from Connected Questions
- The question is automatically placed on the Contact Details page
SMS opt-in requires a phone number field on your form.
Flashquotes AutoDraft
Flashquotes AutoDraft
Automatically pre-build draft quotes from every new contact:
- Set up your default service with pricing
- Configure the service in your form’s Default Service dropdown
- Every form submission creates a draft quote ready to review and send
Instant Quoting
Instant Quoting
Enable automatic quote generation and presentation:
- Click the “Pricing settings” button in your form editor
- Toggle “Quoting Mode” to “Instant Quoting”
- Configure fallback service and pricing rules
- With service selection questions: Uses the service the customer selects
- Without service selection questions: Uses the fallback service (fixed pricing)
- No service selected: Falls back to the configured default service
- Quotes are generated instantly upon form submission
- Clients are redirected to the quote presentation page
- “Book Now” option is immediately available
Instant Quoting is a Pro plan feature that enables clients to inquire, receive quotes, and book in a single session.
Add-ons & Services Customization
Add-ons & Services Customization
Control how add-ons and services appear to your customers:Service Visibility:
- Each service has a toggle switch to show or hide it from the form
- Hidden services won’t appear to customers on the public form
- Hidden services remain available for quotes you build manually
- Toggle visibility from the Services question settings in the form builder
- Drag items up or down in the form builder to set display order
- The order you set affects how items appear to customers
- Most important items should be positioned at the top
- Items without custom ordering display alphabetically
- Mix of ordered and unordered items shows ordered items first
Group Services into Sections
Group Services into Sections
Sections organize your Services question into named, collapsible groups. Available when your company has 4+ services — configured per form.Set up sections:What leads see: sections appear collapsed with a service count and an arrow. The first section is expanded by default. Leads tap a header to expand it.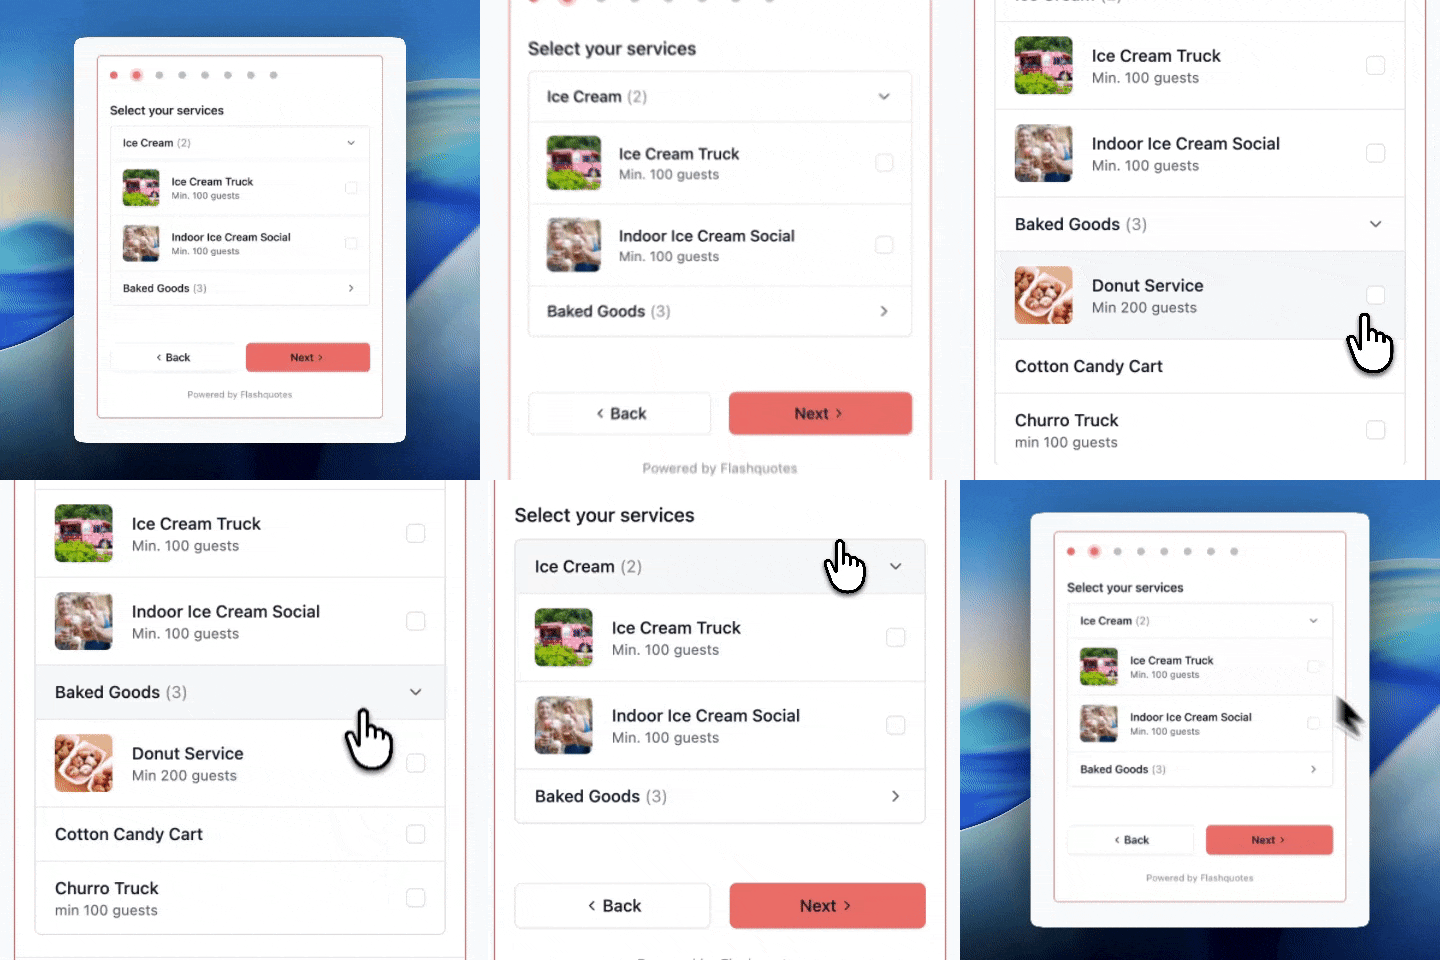
- Open your form in the editor and select the Services question.
- Click Add section in the settings panel. Flashquotes creates two sections (“Section A” and “Section B”) so you can see them immediately.
- Click a section name to rename it inline (e.g. “Bar service”).
- Drag any service into the section it belongs in. Drag a section header to reorder whole sections.
- Click Add section again to add more groups.
Hiding a service (toggling it off) moves it to an Excluded services list below the card. It won’t appear on the form until you turn it back on.
Staffing Calculator Configuration
Staffing Calculator Configuration
Customize how the staffing calculator appears and functions on your lead intake form:Service Length Settings:
- Set minimum service hours (default: 1 hour)
- Set maximum service hours (default: 12 hours)
- Supports half-hour increments
- Configure guest count increment (1-100, default: 25)
- Controls how much the +/- buttons change the guest count
- Example: Set to 10 for smaller events, or 50 for large gatherings
- Define drinks/services per hour per staff member
- Set optional maximum staff limit
- Leave max staff empty for unlimited scaling based on guest count
- Select the Staffing Calculator question under Content, then expand the Staff visual counter section in the settings panel
- Turn on the Enable visual counter toggle to show interactive staff images that adjust with guest count
- Customize staff titles (singular/plural) and a staff description
- Click any of the five Staff Images slots to upload photos of your team (optional)
- Turn the toggle off for a cleaner, text-only display — customize the question title and subtitle instead
The visual staff counter provides an engaging way for customers to see how many team members will serve their event, building trust and justifying pricing.
Set up a service at one fixed address
Use this when a service always happens at the same place, like renting out your event space.- Go to Forms > Create Form > Lead Intake Form.
- On the page with the event address question, click the kebab menu (⋮) and choose Hide from customers.
- Search for your address, pick it from the suggestions, and click Hide from customers.
- Select the Services question and toggle off every service except the fixed-address one.
- Leave travel fees out of that service’s pricing.
- Hide from customers is greyed out: the page has other required questions, like the event date or contact info. Move them to another page first.
- Event maps and the event brief show extra sections: that’s expected for fixed-address services. You can ignore them.
Custom Themes
The theme designer lets you match your lead intake form to your brand — no code required. Click the Design (palette) button in the top-right of the form editor to set colors, fonts, and styling, with a live preview as you make changes.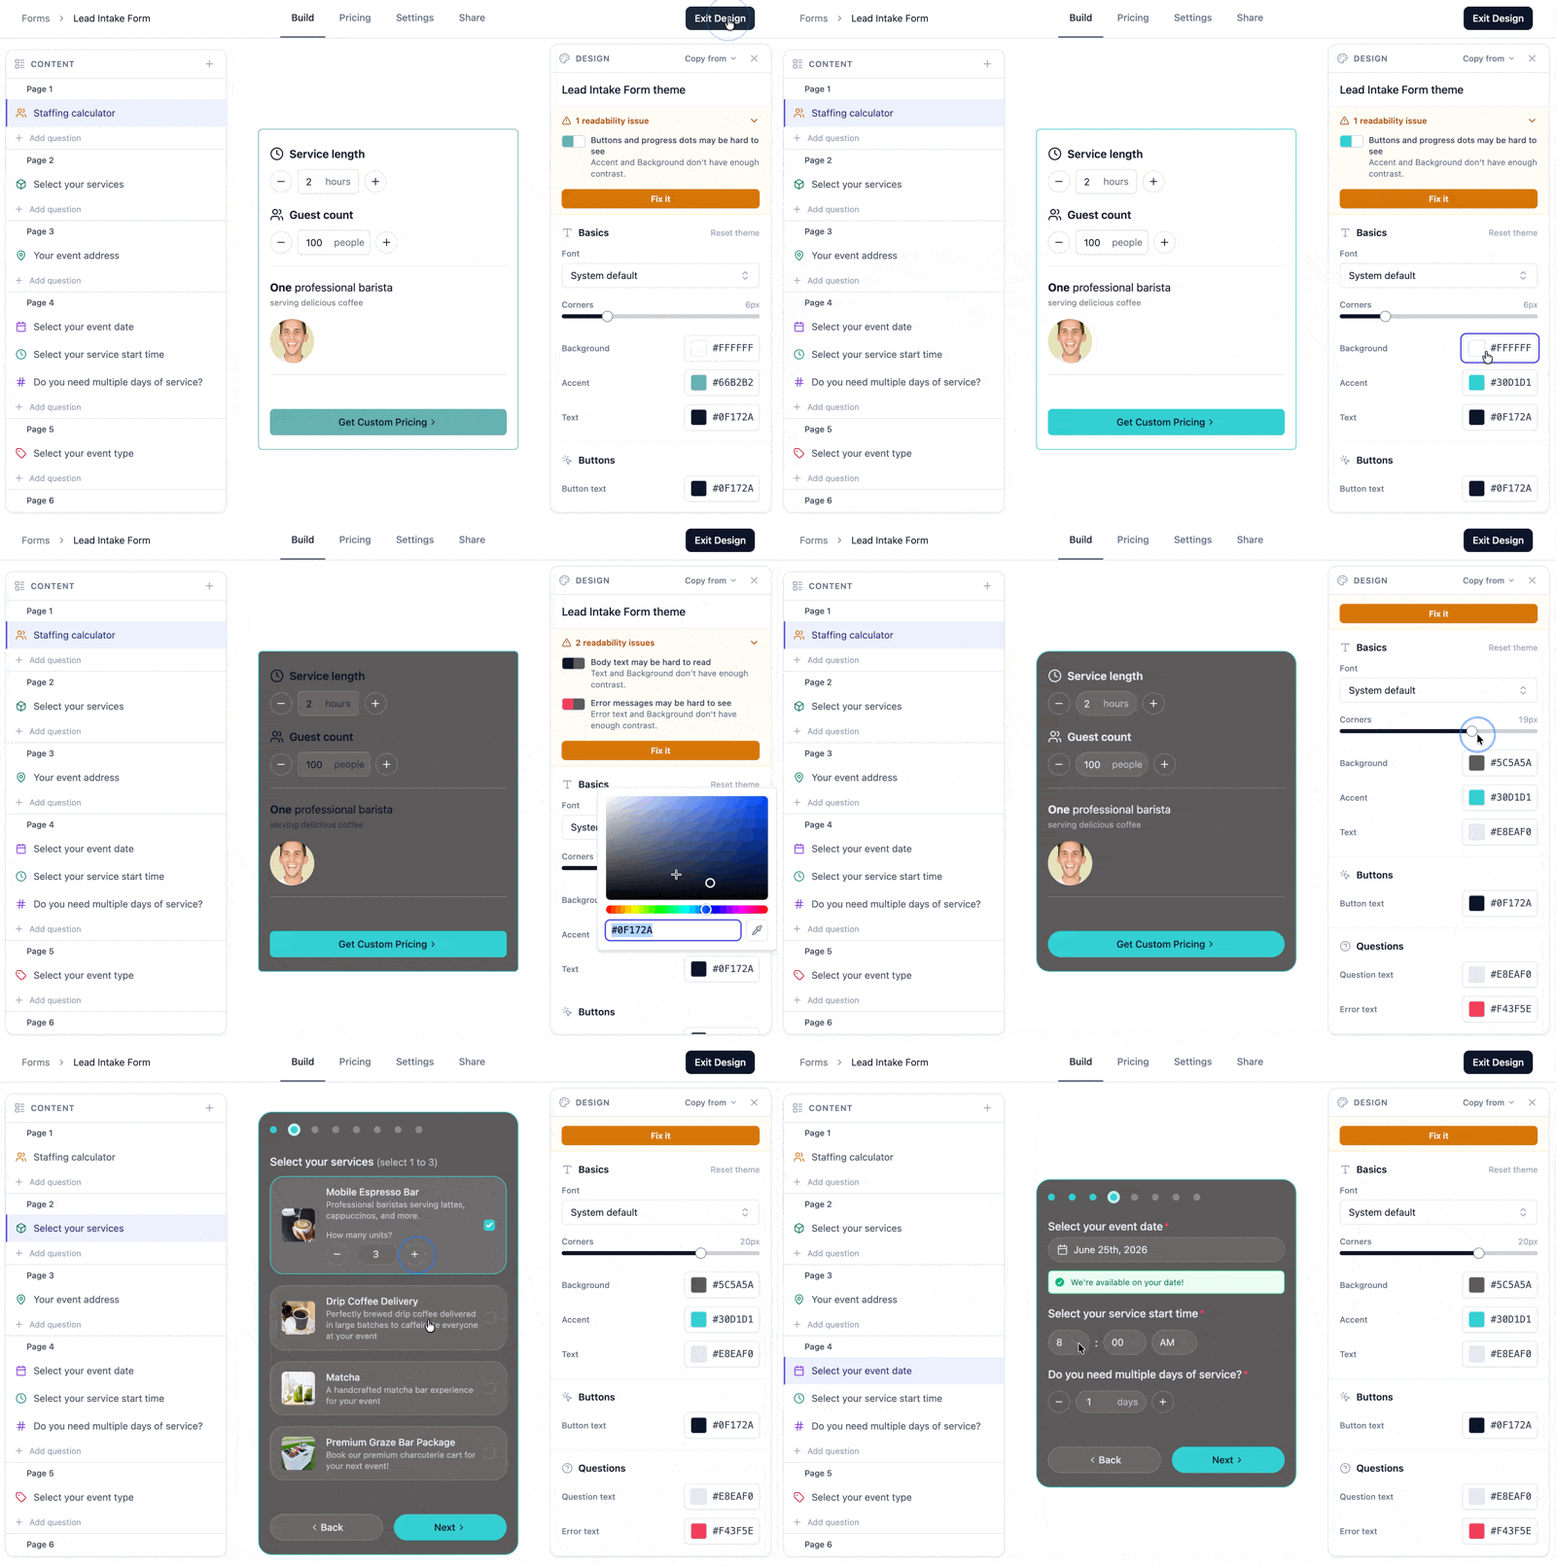
- Brand colors — set your background, accent and text colors so the form looks like the rest of your site
- Fonts — choose the typeface used across questions, labels, and buttons
- Corners — sharpen or soften corners on buttons, cards and the entire form to match your style
- Contrast-detection — we automatically check for color pairs that will make your form less readable, suggesting better options for you
- Live preview — every change renders instantly in the form preview
- Applies everywhere — your theme carries across both embedded forms and hosted share-link pages
- Copy from another form — use the Copy from menu in the Design panel header to reuse a theme you’ve already built on another form
- Reset theme — click Reset theme in the Basics header to restore the Flashquotes default, seeded from your company brand color
Website Integration
Form Embedding
Form Embedding
To embed the lead intake form:
- Click the Share button
- Click Get the code to embed it in your website
- Select your website builder (or General Embeds for any site)
- Copy and paste the code into your website
New to embedding? See our step-by-step embedding guide to get started quickly.
Best Practices
- Keep questions minimal
- Test form on mobile devices
- Set appropriate redirect URLs
- Configure Instant Quoting carefully
- Monitor conversion rates
- Review form analytics regularly
Next Steps
After setting up your lead form:- Configure booking form
- Set up share links for social media and Instagram
- Set up Instant Pricing
- Check platform compatibility
- Monitor contacts
- Track conversion rates
- Optimize form performance