Google Calendar synchronization requires Flashquotes Plus or Pro.
What gets synced
Event details:- Event name and description
- Shift start and end time
- Event start and end time
- Event location/venue address
- Links back to Flashquotes event details and brief
- See Flashquotes events in Google Calendar
- Automatic updates when you change events
- Share availability with team members by inviting them to the GCal event
- Avoid double-booking with personal events
Enable calendar sync
Connect Google Calendar access
If your Google account isn’t already connected with Calendar permissions:
- Go to Settings > Integrations
- Click “Reconnect” next to an existing account
- Grant the additional permissions
Configure calendar sync per location
- In Settings > Integrations, click “Configure” next to Google
- For each location, select which Google account should receive calendar events
- Choose which specific calendar events sync to (or use Primary calendar)
- Choose “None” if you don’t want calendar sync for a location
Choose a specific calendar
After selecting a calendar sync account, choose which calendar receives events.- Go to Settings > Integrations > Configure Google
- Find the location with calendar sync enabled
- Click the Calendar dropdown (appears after selecting sync account)
- Select a calendar or use Primary calendar (default)
- Primary calendar: Your main Google Calendar
- Other calendars: Any calendar you own or manage
Auto-invite staff to calendar events
This feature requires Flashquotes Pro.
- Pro plan
- Google Calendar connected
- Staff need valid email addresses (update in Operations > Staff)
Turn on auto-invites
- Go to Settings > Integrations > Google
- Find “Auto-invite assigned staff to calendar events”
- Toggle it on
- Confirm in the popup
Turn off auto-invites
Toggle the setting off. Staff will stop receiving automatic calendar invites for new assignments. Existing calendar events won’t be affected. Common issues:- Staff didn’t get invite: Check their email address in Operations > Staff. They need a valid email configured.
- Some staff got invites, others didn’t: Only staff with valid email addresses receive invites. Invalid emails are filtered out automatically.
- Setting won’t toggle on: This feature requires a Pro plan.
Choose service time or shift time
Control whether calendar events show just customer-facing service hours or your full commitment including setup and breakdown. Where to configure:- Go to Settings > Locations
- Edit a location
- Find “Calendar sync timing” setting
- Choose Service Time or Shift Time
- Syncs only the hours customers see you working
- Example: 2:00 PM - 4:00 PM (customer event window)
- Use when you want calendar to show only billable hours
- Syncs your full commitment including setup/breakdown
- Example: 1:00 PM - 5:00 PM (with 1hr setup and 1hr breakdown)
- Use when you need to block your entire schedule
How calendar sync works
Events are created when:- A quote is booked by your customer
- You create a manual booking in Flashquotes
- You copy a booking with events
- You change booking details (date, time, location)
- Event name or description changes
- Shift times change
- You cancel or delete a booking in Flashquotes
- You disconnect a Google account that was syncing to calendar
- You change which Google account syncs calendar for a location
- Title: Event name
- Time: Shift start/end
- Location: Event venue address
- Description: Event details and link to Flashquotes
- Source: Shows “Flashquotes” as the event source
View sync status and trigger manual sync
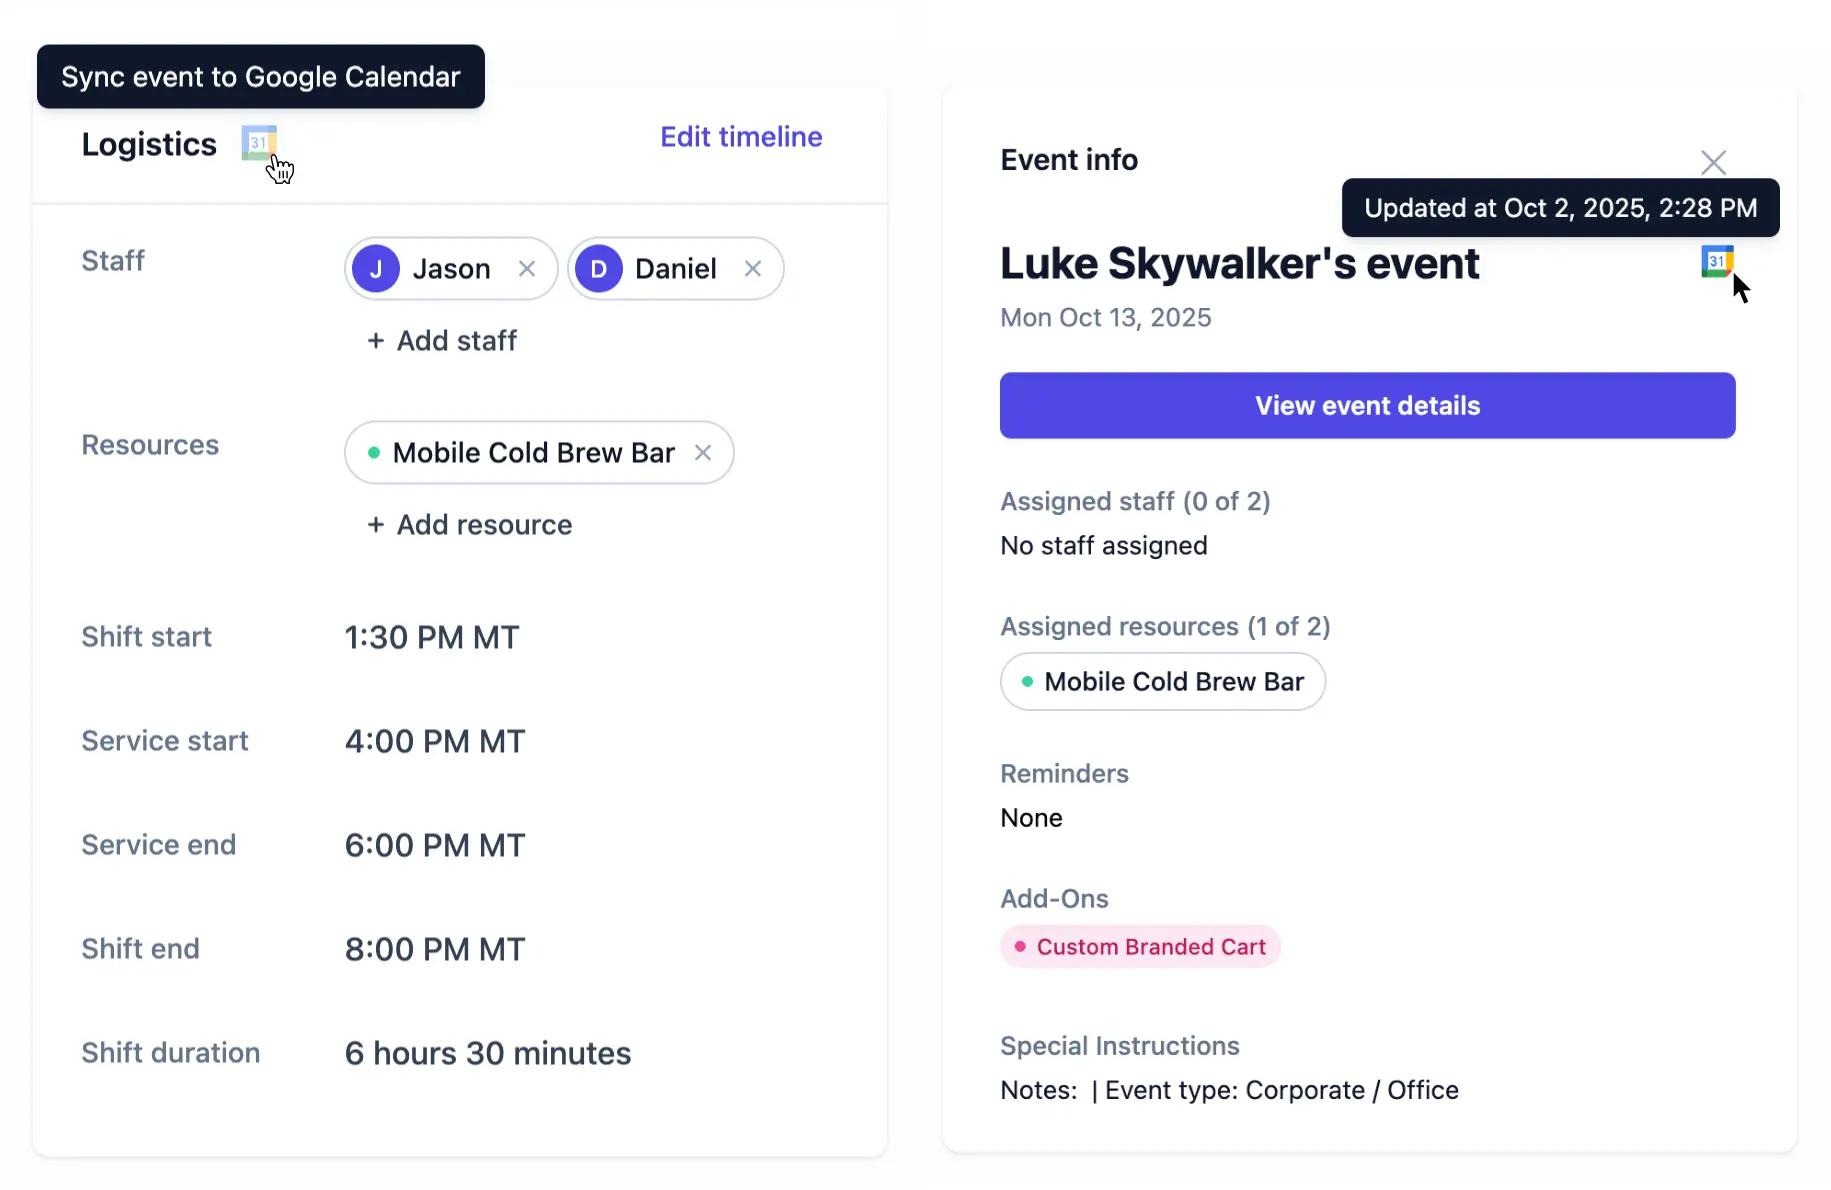
You can check calendar sync status and manually trigger syncs directly from Flashquotes. Where to find sync status:- The Google Calendar icon in the event logistics and calendar event details conveys the status
- If the event is synced, the icon will be solid and will display the sync date on hover
- If the event is not synced, the icon will be transparent and you can click on it to trigger a manual sync
Manage calendar sync
Change which calendar receives events:- Go to Settings > Integrations > Configure Google
- Select a different Google account for a location
- Flashquotes will:
- Remove future events from the old calendar
- Create events in the new calendar for all future bookings
- Go to Settings > Integrations > Configure Google
- Select “None” for the location
- All future events will be removed from Google Calendar for that location
- When you disconnect a Google account, all future calendar events created by Flashquotes are removed
- Past events remain in your calendar but won’t receive further updates
Best practices
- Configure calendar per company location - Link calendars to company locations appropriately
- Don’t manually edit synced events - Changes in Google Calendar won’t sync back; edit in Flashquotes
- Review sync settings regularly - Ensure the right accounts sync to the right locations
- Use one calendar per business unit - Keep different services or locations in separate calendars if needed
Troubleshooting
Calendar events not syncing
- Confirm you have an active Plus or Pro subscription
- Verify “Calendar Sync” permission is granted
- Check that calendar sync is configured for the location in Settings > Integrations > Configure
- Ensure this is a booked event (quotes don’t sync)
- Try reconnecting your Google account
Events not updating
- Verify your Google account is still connected
- Check that you’re editing the booking in Flashquotes (not in Google Calendar)
- Allow a few minutes for updates to sync
- Reconnect your account if issues persist
Events appearing in wrong calendar
- Check location calendar configuration in Settings > Integrations > Configure
- Update the Google account selection for that location
- Events will migrate to the correct calendar
Events disappeared
- Check if your Google account was disconnected
- Verify calendar sync is still configured for the location
- Reconnect your account to resume syncing
Next steps
- Enable full Gmail integration to sync customer emails (Plus/Pro)
- Set up location defaults
- Upgrade to Plus if you don’t have it yet